Montag, 21. Juli 2014

Peanut Butter Chicken with Rice Noodles


So today I wanted to show you one of my favorite and easiest recipe. I like to experiment with food and I always loved sate sauce, so I fried chicken in peanut butter and it was delicious. This dish is ready in less than 20 mins and a delicious meal if you do not have a lot of time for cooking. I hope you will like it!
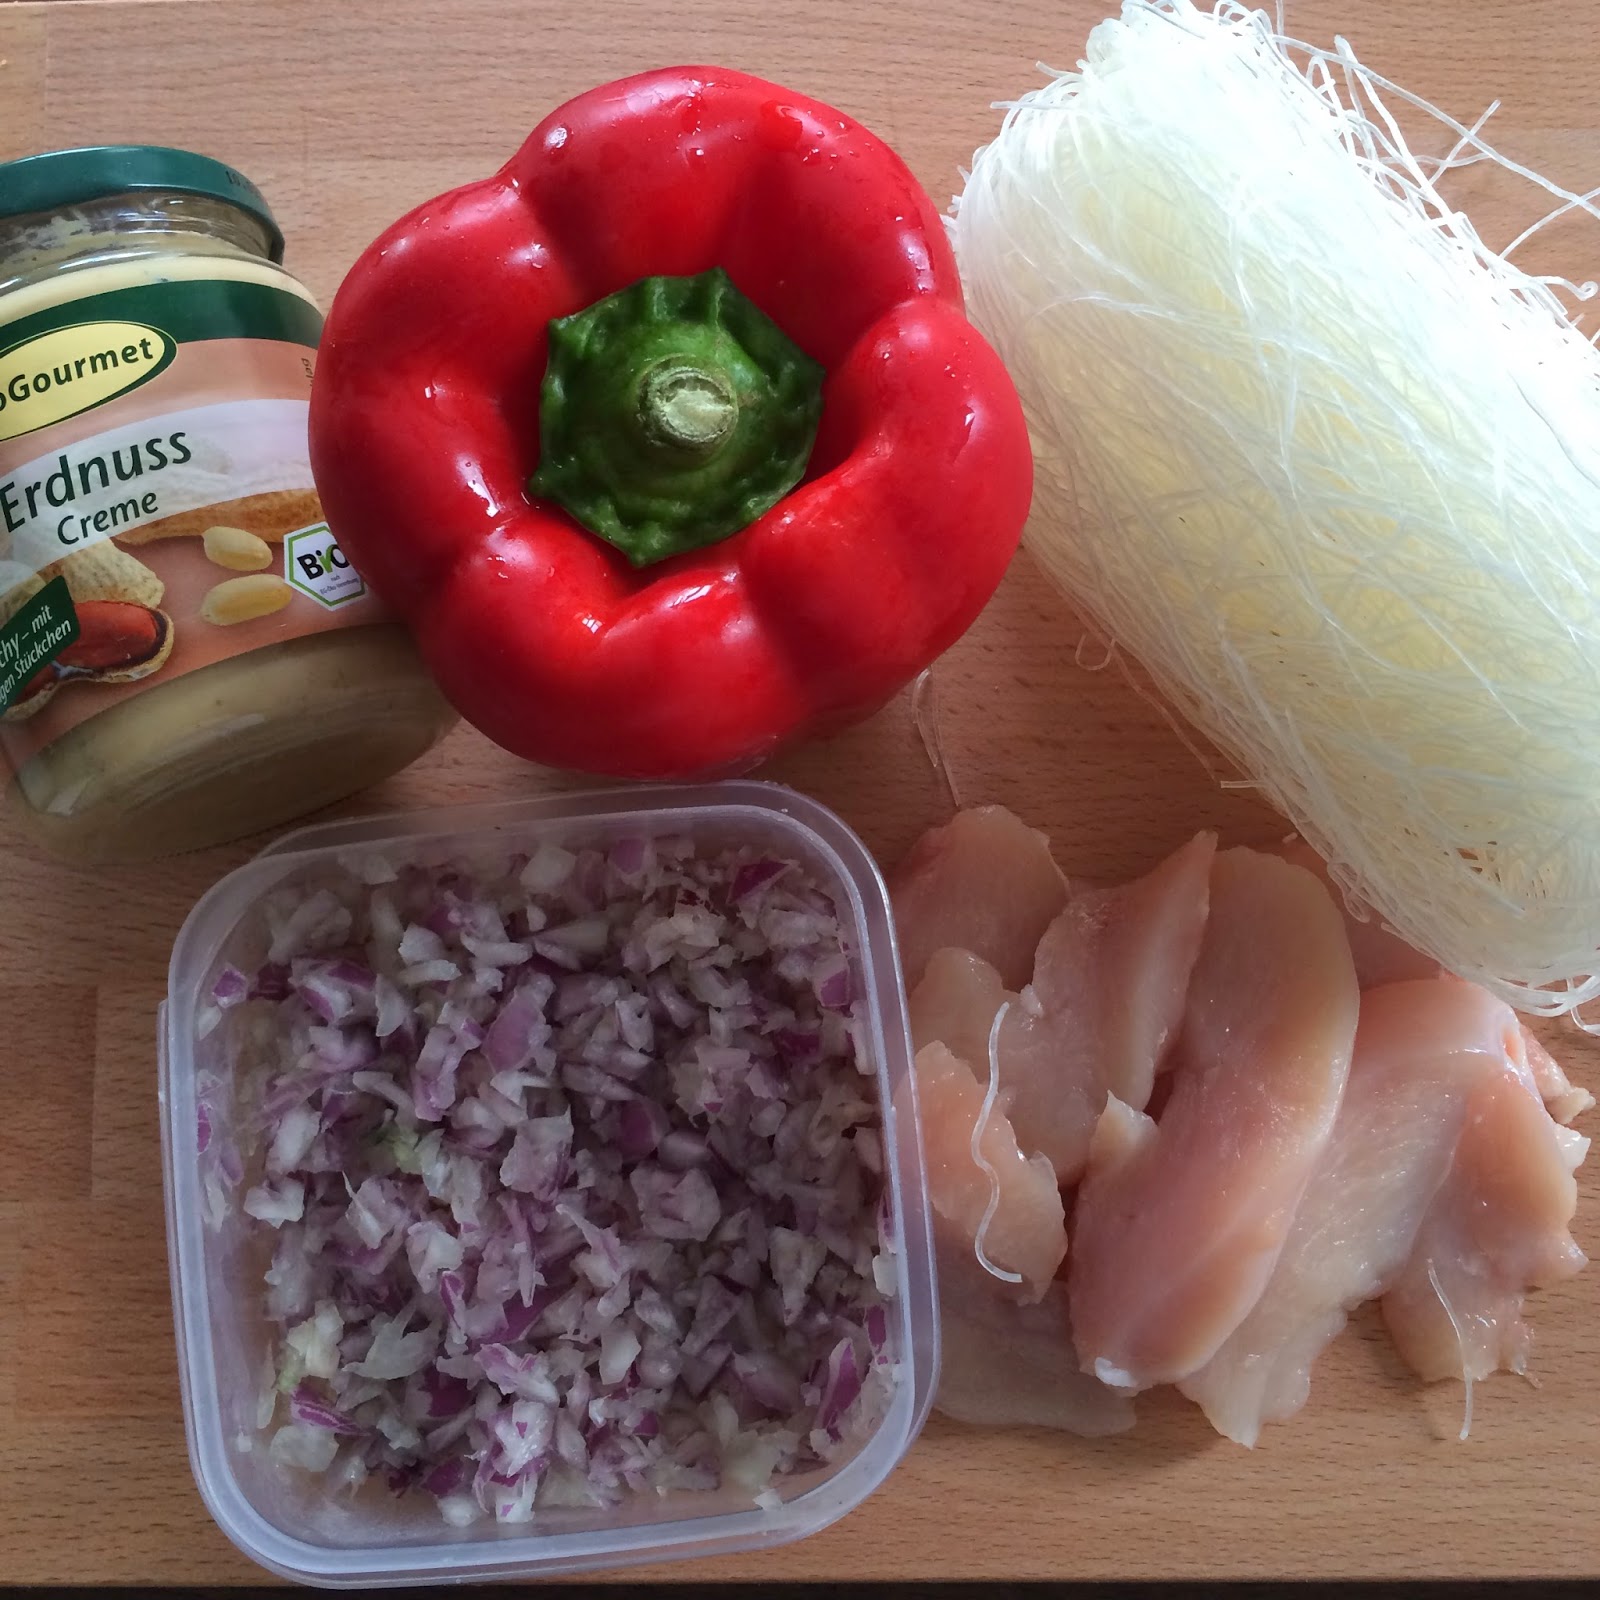
You need:

1-2 Chicken Breasts
1 red Bell Pepper
1/2 red Onion
3 tbsp Peanut Butter
1 tbsp Teriyaki Sauce (You can also use Soy Sauce if you do not have any Teriyaki sauce in hand)
100g/ 4 cups Rice Noodles
And that's how you do it:

1. Prepare the noodles as it is said on the directions. You usually pour the noodles in boiling water and let them soak for about 10 mins.
2. Preheat a pan with some olive oil

3. Cut bell pepper into small pieces. They do not have to be too small, because they will shrink later when you cook them. Now cut the onion into little pieces.
4. Put bell pepper and onion into the pan. Let it cook at a medium heat for a few minutes. Wait until the onions are glassy and the pepper is soft.
5. While the vegetables are cooking, shred the chicken into small pieces.

6. When the vegetables are good add the shredded chicken and let fry until the chicken is well done.
7. Now you can add the peanut butter and teriyaki sauce (soy sauce). Season the dish with some salt and pepper.
8. Let it cook for 1-2 more minutes.
9. Place the noodles on a plate and top it with the chicken, peanut butter sauce.

10. On the picture I placed some teriyaki sauce as decoration on top of it. The sweet teriyaki sauce is a great addition to this dish.

Guten Appetit!

Sonntag, 13. Juli 2014

Nudelsalat

Heute möchte ich Euch das Rezept meines berühmten Nudelsalats vorstellen. Wenn du zum Grillen oder zu einer Feier eingeladen bist, dann ist es das perfekte Essen zum mitbringen.

Du brauchst:
500g Nudeln (Farfella, Penne, Spirali)
150g  Dosen Tunfisch
125g Parmesan
6 Strauchtomaten                        
165g Oliven (Ich habe grüne benutzt, schwarze gehen aber auch oder auch beide gemischt)
1 Rote Zwiebel
100g getrocknete Tomaten
200mlTomatensoße
2 TL Tomatenmark
4 TL Olivenöl
75g Rucola

 Und so wird's gemacht:

1. Koche Wasser in einem Topf und füge etwas Salz hinzu. Wenn das Wasser kocht schütte die Nudeln in den Topf und lass sie für ca. 12-14 Min. kochen.

2. Wenn Du die getrockneten Tomaten in Öl gekauft hast, fange das Öl auf und stelle es zur Seite. Wenn nicht, dann ist das auch kein Problem, Du kannst nachher einfach normales Olivenöl verwenden. Schneide nun die getrockneten Tomaten in kleine Stücke.


3. Schneide die frischen Tomaten und Zwiebeln in kleine Stücke. Ich habe schon vorgeschnittene Oliven geholt, ganze gehen natürlich auch und müssen jetzt klein geschnitten werden.

4. Jetzt fülle den Tunfisch, Parmesan, Tomaten, Zwiebel, getrocknete Tomaten und Oliven in eine Schüssel und vermenge alles ordentlich.

5. Schütte die Tomatensoße, Tomatenmark und das Öl in die Schüssel und vermenge alles erneut.

6. Nimm die Nudeln aus dem Topf und lass sie abkühlen. Ich spüle sie für Gewöhnlich mit kalten Wasser für ca. 30-60 Sec. ab.

7. Bringe Nudeln und Soße zusammen und vermenge es zum letzten mal. Ich würde es empfehlen den Salat einen Tag eher zu machen, damit die Nudeln die Soße über Nacht aufsaugen können. Kurz bevor der Salat serviert wird füge noch ein wenig Rucola hinzu.

Guten Appetit!

Pastasalad

For today I want to share with you the recipe of my famous Pastasalad. If you are invited to a barbecue or cookout it is the perfect dish to bring.
Tonight is Germany's big day, they are playing the final against Argetina. I want you all to cross your fingers for Germany. Because of the final we are having a little party tonight and that is why I prepared my salad last night.

You need:
500g / 6 1/2 cups Pasta (Farfella, Penne, Spirali)
150g/ 1 cup Canned Tuna
125g/ 1 cup Parmesan
6 vine tomatoes
165g/ 1 1/4 cups Olives
1 Red Onion
100g/ 1/2 cup Dried Tomatoes
200ml / 3/4 Pasta Sauce
2 tbsp Tomato Paste
4 tbsp Olive Oil
75g/ 1 cup Arugula

And that's how you do it:

1. Start boiling water in a pot and add some salt. When the water is boiling add the pasta and let it cook for about 12-14min.

2. If you bought the dried tomatoes in oil set the remaining oil aside in a different container, if not that is not a problem, you can also use olive oil later on. Now start cutting the dried tomatoes in little pieces.
3. Cut fresh tomatoes and onion in little pieces. If you did not buy the olives already chopped, then also cut them into little pieces.
4. Now put the tuna, parmesan, tomatoes, onions, dried tomatoes and olives in a bowl and mix it all up.

5. Add the pasta sauce, tomato paste and either the oil from the dried tomatoes or simple olive oil and mix it all together once again.


6. Take the pasta out and let it cool down. I usually rinse it with cold water for about 30-60sec. and then let it stand until they are not hot anymore.


7. Add pasta to the sauce and mix it together. I would suggest to let it stand overnight, so the pasta can soak up the sauce. If you do not have enough time to do that you can add the arugula right away. I would not add the arugula if it will sit the whole night, because it will get too mooshi and it is nicer if it is crispy and fresh.


8. Now you can decorate it with a little arugula and parmesan and that's it!

Guten Appetit!

Dienstag, 8. Juli 2014

Very Berry Schokoeis


Das heiße Wetter bringt mich immer dazu Eis zu essen. Wie meine Freunde wissen, liebe ich Eis. Ich könnte es jeden Tag essen. Mein lieblings Eis bekomme ich in den USA bei Cold Stone. Du kannst dir jede Eissorte aussuchen und dann vermischen sie das Eis mit Streuseln, Brownies, Keksen etc. auf einer kalten Steinplatte. 

Das Bild wurde im Sommer 2010 in Toronto gemacht. Ich war dort mit meiner Gastmutter und meiner Freundin Tanja. Wir haben dort ein Cold Stone direkt neben unserem Hotel gefunden, dass 24h auf hatte. Das hat uns natürlich dazu gebracht, zu kontrollieren, ob es auch wirklich Mitten in der Nacht noch offen war. Also  sind wir dann nachts um zwei tatsächlich zu dem Laden gegangen und haben köstliches Eis gegessen.

Mein Eis Rezept ist ein bisschen anders.


Du brauchst:

500ml gefrorene Früchte (natürlich kannst du auch frische nehmen!)
50 ml Wasser
2 TL Vanille Zucker
Jede Art von Schokolade
Eisformen


Und so wird's gemacht:


1. Fülle die Früchte in eine Schüssel und schütte heißes Wasser dazu.


2. Zerkleinere die Früchte mit einem Mixer bzw. Pürierstab. Es ist nicht schlimm, wenn noch ein paar ganze Früchte dazwischen sind.


3. Nun kannst du den Zucker hinzufügen. Ich habe Vanillezucker verwendet, weil es gut harmoniert mit den sauren Bären. Ansonsten kannst Du jeden Zucker verwenden den du magst und natürlich auch so viel, damit es süß genug für Dich ist.


4. Fülle die pürrierten Früchte in die Eisformen. Ich habe meine wirklich günstig bei Ikea bekommen. Schüttel die Form ein wenig, damit nachher keine Blasen im Eis sind. Stelle das Eis für mindestens vier Stunden in das Gefrierfach.


5. Jetzt kannst du Wasser in einem Topf erhitzen und dort ein metall Messbecher reinsetzen. Lege die Schokolade in den Messbecher und lasse sie schmelzen. Damit sie nicht verbrennt rühre die Masse ab und zu um.


6. Wenn die Schokolade komplett geschmolzen ist schalte den Herd aus und Nimm das Eis aus dem Gefrierfach. Nun stecke das Eis in die Schokolade. Weil das Eis kalt ist und die Schokolade heiß, ist es ein wenig schwierig, dass die Schokolade am Eis bleibt. Am besten verteilst Du sie mit einem Löffel. Die Schokolade erkaltet sehr schnell, sodass du das Eis entweder sofort essen kannst oder es wieder zurück ins Eisfach packen kannst.

Guten Appetit!


Very Berry Chocolate Covered Ice Pops

The hot weather always makes me want to eat ice cream 24/7. As my friends know I love Ice cream, I could eat it at any time. My favorite place in the USA is cold stone. You choose the kind of ice cream you want and then they mix it up on the cold stone with everything you want, like sprinkles, brownies, fruits, fudge, sauce etc.

This picture was taken 2010 in Toronto. I went there with my hostmom and my friend Tanja. We found a cold stone right next to our hotel that was open 24/7. We decided, that we wanted to go to bed, set an alarm and eat ice cream in de middle of the night to see if the store was really still open. So we ended up going there at 2 in the morning and having delicious ice cream!

My recipe is a little different, it's actually just mixed fruits covered with chocolate.
You need:
500 ml/ 2 cups of frozen, mixed Fruit (they can also be fresh, I used a berry mix from the grocery store)
50 ml/ 2 Oz Water
2 Tsp. Vanilla Sugar
1bar of any kind of chocolate
A tray of ice pop makers


And that's how you do it:

1. You put about half of the fruits in a bowl and add hot water. Then mix it / squeeze it with a blender. Now add the rest of the fruits you have left.


2. Mix it until its homogeneous mass. If there are still some whole fruits left, it does not matter. It will be delicious if you eat it later and still have some raspberry pieces in there.
3. Now you can add the sugar. I used vanilla sugar, because I thought its a really good match with the sour berries. You can use any sugar you want and actually any amount of sugar you want, as long as it is sweet enough for you.
4. Fill the berries in the ice pop makers, I got mine from Ikea, they were really cheap and do great work. Make sure to shake it a little bit, so you do not have air bubbles in it. Put the tray in the freezer and wait for at least 4 hours.
5. Now you cook water in a pot and put a metal cup/mug in the boiling water. You put the chocolate in it and wait for it to melt. Stir it from time to time, so it will not burn to the bottom.
6. When it is completely melted turn the stove off and take the ice pops out of the freezer. Now dip about the half of the ice pop in to the melted chocolate. Because the Ice pops are cold, the hot chocolate will not stick to it right away. You can spread it over the ice pop with a spoon. Try to get a little bit more chocolate on one side and then even the rest out. The chocolate will freeze pretty fast, so you can eat them right away or put them back in to the freezer.


7. Now you can enjoy the very berry chocolate covered ice pops on a hot summer day. If you have problems getting the Ice pop out of the maker, rinse it under hot water for a few seconds.


Guten Appetit!

Montag, 7. Juli 2014

Quiche Lorraine


Ich möchte euch heute meine neuste Blog Kategorie vorstellen. So viele meiner Familie und Freunde haben mir gesagt, dass sie ein Rezept für meinen Blog haben. Deshalb gibt es nun das Label 'Inspired Food'. Als erstes ist meine Mutter dran, sie wollte, dass ich eine Quiche mache und hat mir ihr Rezept gegeben. Ich hoffe, Euch gefällt es und Ihr werdet im Oktober die Quiche mit einem Glas Federweißer genießen!


Du brauchst für den Teig:

200g Mehl
100g weiche Butter
50g Wasser
1/2 TL Salz

Für die Füllung:
200g Speck Würfel ( Für eine vegetarische Alternative kannst du die gleiche Menge an Champinons verwenden)
200g geraspelten Käse (z.B. Gouda, Emmentaler etc.)
3 Eier
200g Sahne
1/4 EL Pfeffer
2 Prisen Salz
1 Prise Muskatnuss

Und so wird's gemacht:

1. Fülle alle Zutaten für den Teig in eine Schüssel und vermenge sie mit einem Rührgerät. Vermische es bis es eine homogene Menge ist.

2. Heize den Ofen auf 180°C auf.

3. Nun fette deine Backform ein. Ich habe eine extra Quiche Form benutzt, aber eine einfache runde Springform ist auch völlig in Ordnung.

4. Fülle den Teig in die Form und ziehe ihn an den Seiten für ca. 2cm hoch. Steche Löcher in den Teig, sodass der Teig nicht nachher hochgeht und Blasen bildet. Stelle den Teig in den vorgeheitzten Ofen für ca. 15 Min und lasse ihn vorbacken.

5. Schütte die Speckwürfel auf den vorgebackenen Teig. Wenn Du die vegetarische Alternative machst, schneide die Champions in Scheiben und lege sie ebenfalls auf den Boden des Teigs.

6. Mische die restlichen Zutaten für die Füllung zusammen und schütte sie über den Teig.

7. Nun packe den Teig für weitere 35 Min. zurück in den Ofen.

8. Nimm die Quiche raus sobald sie gold-braun ist.

Guten Appetit!

Quiche Lorraine

Because of Friday's game, Germany - France, I made a Quiche Lorraine. For the people who do not know I have some French influences, but Germany will still be my favorite of all time! 

Also today I want to introduce you to a new category. So many of my friends and family have told me, that they have recipes for the blog. That is why I decided to have a label that is called inspired food by friends and family. My mom is going to be the first person featured. She actually wanted me to make this quiche for Friday night and I thought it was a great idea to share the recipe. I hope you will all like it and maybe enjoy the quiche yourself in October with a glass of "Federweißer"!

You need for the dough:
200g/ 2cups Flour
100g/ 1/2cup soft Butter
50g/ 1.7 Oz Water
1/2 Tsp Salt

For the filling:
200g/1cup sliced bacon (for the veggie alternative you use the same amount of mushrooms)
200g/ 2cups shredded Cheese e.g. Gouda
3 Eggs
200g/ 1cup Cream
1/4 Tsp Pepper
2 pinches Salt
1 pinch Nutmeg


And that's how you do it:
Put all ingredients for the dough in a bowl and mix it up. I used a kitchen machine, but you can also do it with a handheld electric mixer.

Stir it until it is a homogeneous dough. Pre head the oven to 180° Celsius or 356° Fahrenheit.

Now butter your backing pan to avoid that your quiche will stick to it after backing. I used a special backing pan for quiches, but you can also you a springform pan, or any other as long as they are round.

Now put the dough in the pan. Make the dough go up the edges for about 2cm or 0.7 inches. Poke holes into the dough with a fork, so the dough will not blow up in the oven. After that you put it in the oven for about 15 min so it can prebake.

Now slice the mushrooms and put it on the bottom of the prebaked dough. Do the same if you make the quiche Lorraine with bacon.

Mix the remaining ingredients for the filling together and pour it over the bacon resp. over the mushrooms. Now put it back into the oven for about 35 mins.


Take it out when the dough is golden brownish and crispy. Now it is ready to be served with a nice cold glass of Federweißer!

Guten Appetit!